Saturday, July 12, 2008

Add Another Etsy Shops EtsyMini to a Blog

Love another Etsy Shop and want to showcase their mini on your blog? Here is how!

Create a Etsy Mini from your shop by selecting 'Etsy Mini' on the bottom left side of Your Etsy.


Customize the Mini for Your Shop; choose Thumbnail or Gallery and the size


Copy the JavaScript Mini Info. Paste that into your blog post.


Now go find your Feature Shop and Copy the Number after the shops URL.
See the highlighted blue text '5514325' is this shops number.


Paste that over your shop number in the Etsy Mini.
So I will replace '5170436' with '5514325'


Here is the result:


Want your mini a different size?
This number changes the height of the mini ~ from 1 to 7


This number changes the width of the mini ~ from 1 to 7

Change Blog Font Colors

Go to Layout; then Fonts and Colors
Scroll down until you see Sidebar Text and Sidebar Link Visited
If you don't see a color you like, go to http://www.computerhope.com/htmcolor.htm
Choose your color, Copy the Code (#ffffff); then Paste it into the box highlighted with a green circle.
Save Changes


Posting a Photo from Flickr on a Blog

FYI ~ I use Flickr, but do not use them for hosting my website and blog images. I prefer Photobucket.com for image hosting. People do use them for hosting, so here is how to get an image URL. :) Have a great day!

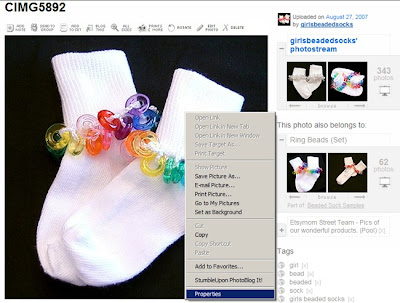
Click on the Flickr photo you want to use.
Place your mouse over the picture and Right Click
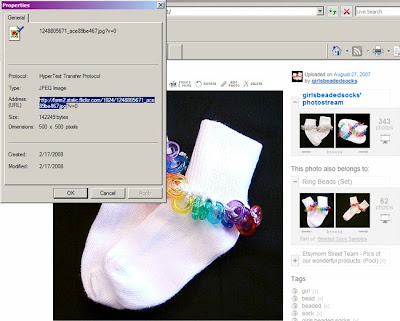
Choose Properties


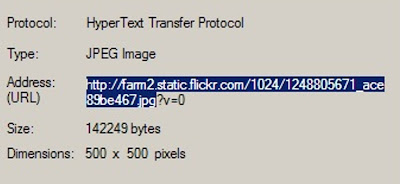
Highlight and Copy (ctrl+C) the file URL
http://farm2.static.flickr.com/1024/1248805671_ace89be467_m.jpg


The URL will end with .jpg ~ do not copy the other information at the end of the URL. See what I have highlighted for example.


Paste (ctrl+V) into html
This code:

Produces this Flickr Image:


Add width="250" after the .jpg" to size the image ~ change 250 to any number depending on the size you want.

Edit Minima Blog Template

Log in to your Blog
Go to 'Layout'
Then 'Edit HTML'


Before you change any of the code ~ Save a Copy ~
Choose 'Download a Full Copy' save it somewhere on computer ~ title blog template.
Just in case! :)


Scroll down until you see Header
Change 660 px to 820
Don't add any spaces, only change the numbers.


Scroll down #header description
Change 700 px to 820


Scroll down to Outer-Wrapper
Change Outer-Wrapper width from 660 px to 820

Change Main-Wrapper width from 410 px to 600
Leave Sidebar-wrapper at 220. Main-wrapper and Sidebar-wrapper can be adjusted.
Together they should be less than 820.


Scroll down to #footer
Change width from 660 px to 820


Click 'Save Template'

Edit Scribe Blog Template

Log in to your Blog
Go to 'Layout'
Then 'Edit HTML'


Before you change any of the code ~ Save a Copy ~
Choose 'Download a Full Copy'


Hightlight or select the http below and Copy (Ctrl+C)
http://i180.photobucket.com/albums/x251/BeadedSocks/bg_paper_topp.jpg
and Paste (Ctrl+V) over this selected area in your template:


Hightlight or select the http below and Copy (Ctrl+C)
http://i180.photobucket.com/albums/x251/BeadedSocks/bg_paper_bottom.jpg
and Paste (Ctrl+V) over this selected area in your template:


Hightlight or select the http below and Copy (Ctrl+C)
http://i180.photobucket.com/albums/x251/BeadedSocks/bg_paper_middle.jpg
and Paste (Ctrl+V) over this selected area in your template:


Change all four 700 px widths to 820


Change 430px to 550
Change 150px to 210
These can be adjusted, but must stay below 770 total.


Click 'Save Template'


Click on this image to save a copy of the header graphic on this blog ~ it matches the background. To save the image Right Click and Save Picture

Add a Page Element to a Blogspot Blog

Click on the image to view it larger
Log in to Blogger.com
Choose 'Layout' ~ 'Add a Page Element' ~ 'HTML / Java Script'
Paste (ctrl+V) your code into the box
'Save'

HTML Code EtsyMom Example

This Code ~click picture to enlarge


will produce this........
Beaded Socks

Girls Beaded Socks Daisy Designs.

A little more description about your item!

Build a Light Box 101


Thanks to this tutorial:
http://www.pbase.com/wlhuber/light_box_light_tent/

With this new light box you can change the background. My poster board has two holes punched at the top, then attached with little screws. :)

We made a few alterations:
My husband added a piece on the top for an extra light.
The box is lined with tissue paper, instead of a sheet. I used double stick tape to attach the tissue paper to the PVC pipe.

Donna Pool recommended foam boards covered with tinfoil to brighten the object.
Thanks for the Tip :)

Photo Helps 101

A simple light box with white foam board taped together.
Click here for instructions on how to make ~ http://www.ourmedia.org/node/253481


For my black background pictures, I use halogen shop light. Don't shine them directly on the items being photographed.


Tripod ~ from Walmart about 30$ (they sell a cheaper one, but it isn't very good)


My camera set on "Macro Mode with High Saturation"

Camera "White Balance" is set to indoors ~ little light bulb for the symbol.

A piece of black fabric is used for my background.


Hopefully I will be able to take more pictures with white as the background.

You can add a piece of glass underneath to create a reflection on the bottom. Have also heard of people using a white board under the object.

To create a floating look add frosted plexiglass under the item with a light below.

When using a photo imaging software, you can click on the background and delete it from the picture. See example in the socks on the card below ~ the picture was taken with a black background.

Street Team Signature Help 101

If you don't have your banner saved to your computer; you can upload it from your etsy account to Photobucket.com.

In Appearance ~ under Shop Setup in Etsy
Right click on your mouse while your pointer is on your banner.
Click Properties (with the left side)


Highlight and copy (Ctrl+C) the address URL for the image.

Paste (Ctrl+V) that address or URL into photobucket


Now that you have your banner in your photobucket account. Highlight the url/code below the banner picture labeled "IMG Code" (See Photo Below ~ Click to Enlarge).


Paste that code into your signature under Profile. **Do not add anything to the code.**

On EtsyBaby it will look like this (go to Profile, then Forum Profile Information):
Click on 'Profile' at the top

Then click on 'Forum Profile Information' on the left-hand side
in the Signature Box ~ Paste your text and click 'Change Profile'

On EtsyKids it will look like this:


On EtsyMom it will look like this:


*~*~*~*~*~*~*~*~*~*~*~**~*~*~*~*~*~*~*~*~*~*~**~*~*~*~*~*~*~*~*~*~*~*

Make Your Signature into a Link to Your Etsy Shop.

[URL=http://YOURSHOPNAME.etsy.com] IMAGE [/url]

Copy the code above and paste it into word or notepad (any program you can type in).

Copy your "IMG Code" from Photobucket and Paste it over the word IMAGE and change YOURSHOPNAME.

*~*~*~*~*~*~*~*~*~*~*~**~*~*~*~*~*~*~*~*~*~*~**~*~*~*~*~*~*~*~*~*~*~*

My HTML Signature Example:


*~*~*~*~*~*~*~*~*~*~*~**~*~*~*~*~*~*~*~*~*~*~**~*~*~*~*~*~*~*~*~*~*~*

Upload Your Avator the Same Way
In your Etsy Store, position the mouse over your avator. Right Click


Select the URL and copy it (Ctrl + C)
Paste that into the Photobucket web url upload.