Do not use the zoom. Get as close to your object with no zoom. The colors and quality will be a lot better.
Purchase White posterboard for the background; for my white objects I also have light blue, yellow, light pink and neon green.
I use a light box (Photos of my Box), but it isn't needed.
For small items, curve a piece of posterboard in front of a window with lots of sunlight (not direct light). You can use pieces of cardboard like this post by donnapool Donna's Taking Pictures Tips
With a light box ~ Manually set the white balance with a sheet of extra bright white computer paper.
Change the EV Shift to a brighter setting (mine is at +1.3) ~ it makes the photos brighter before editing them on the computer. I learned how in this Storque article, bright-light-big-color-using-ev-and-white-balance
Set camera to the Macro Setting for upclose objects.
My camera (not a new fancy one) allows you to save the settings based on previous photos you have taken. When I get a photo that the color looks really good and it is easy to clean up, I save it so I can easily go back and start from that point the next time.
Here is a blog post on how I remove the background on my photos.
White Background Blog Post
My color is usually pretty good, but I do add brightness and contrast to all of my photos.
I am not at all an expert, just thought I could offer what has been working for me lately.
Showing posts with label Photography. Show all posts
Showing posts with label Photography. Show all posts
Saturday, July 12, 2008
Add a Color Background to White Objects
PhotoShop Elements 5.0 ~ Edit and Enhance Pictures
If your background is a different color than the object, use the 'Magic Wand Tool' to select the background color. When it is selected hit Delete on your Keyboard.
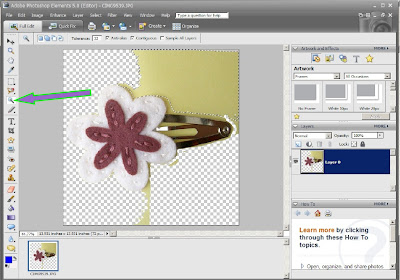
You may have to repeat this step on different areas of the photo.
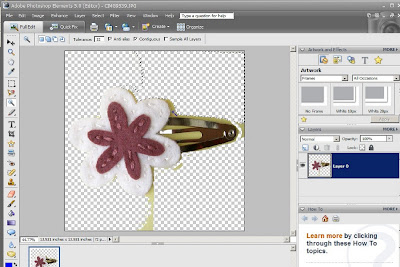
Select the whole object again, using the 'Rectangle Marque Tool' (Square Outline)
Zoom into your photo and clean up the edges with the 'Eraser Tool'
Depending on how picky you are, this could take hours or a couple of minutes.
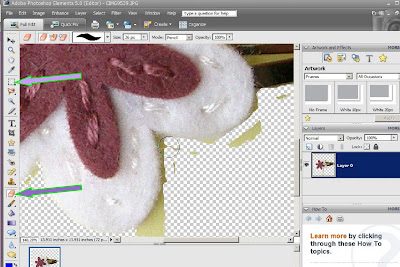
I play with this step for hours!
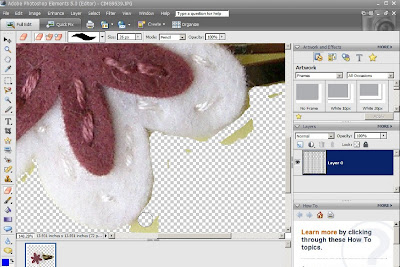
You can also change the background to white (or any color) using the 'Paint Brush Tool'
Choose the color you want to paint down at the bottom; the top color is what will be painted.
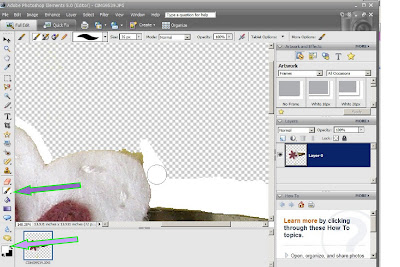
You can see I have done both on this picture Deleted some of the Background (checkerboards) and changed some to White.
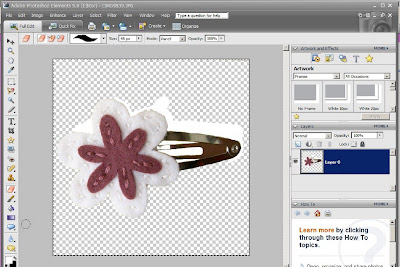
Now that your background is white or deleted, you can add a color using the 'Paint Bucket Tool'
Choose the color you want it to fill down at the bottom; top square will be the filled color.
It will paint it on the color you click on. If you click on something by mistake, Ctrl+Z will undo. :)
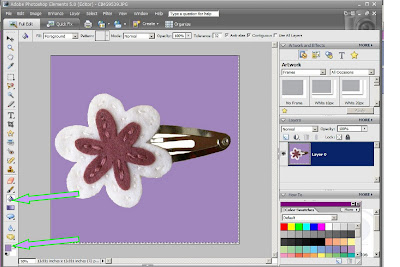
If your background is a different color than the object, use the 'Magic Wand Tool' to select the background color. When it is selected hit Delete on your Keyboard.

You may have to repeat this step on different areas of the photo.

Select the whole object again, using the 'Rectangle Marque Tool' (Square Outline)
Zoom into your photo and clean up the edges with the 'Eraser Tool'
Depending on how picky you are, this could take hours or a couple of minutes.

I play with this step for hours!

You can also change the background to white (or any color) using the 'Paint Brush Tool'
Choose the color you want to paint down at the bottom; the top color is what will be painted.

You can see I have done both on this picture Deleted some of the Background (checkerboards) and changed some to White.

Now that your background is white or deleted, you can add a color using the 'Paint Bucket Tool'
Choose the color you want it to fill down at the bottom; top square will be the filled color.
It will paint it on the color you click on. If you click on something by mistake, Ctrl+Z will undo. :)

Build a Light Box 101
Thanks to this tutorial:
http://www.pbase.com/wlhuber/light_box_light_tent/
With this new light box you can change the background. My poster board has two holes punched at the top, then attached with little screws. :)
We made a few alterations:
My husband added a piece on the top for an extra light.
The box is lined with tissue paper, instead of a sheet. I used double stick tape to attach the tissue paper to the PVC pipe.
Donna Pool recommended foam boards covered with tinfoil to brighten the object.
Thanks for the Tip :)
Photo Helps 101
A simple light box with white foam board taped together.
Click here for instructions on how to make ~ http://www.ourmedia.org/node/253481

For my black background pictures, I use halogen shop light. Don't shine them directly on the items being photographed.

Tripod ~ from Walmart about 30$ (they sell a cheaper one, but it isn't very good)

My camera set on "Macro Mode with High Saturation"
Camera "White Balance" is set to indoors ~ little light bulb for the symbol.
A piece of black fabric is used for my background.

Hopefully I will be able to take more pictures with white as the background.
You can add a piece of glass underneath to create a reflection on the bottom. Have also heard of people using a white board under the object.
To create a floating look add frosted plexiglass under the item with a light below.
When using a photo imaging software, you can click on the background and delete it from the picture. See example in the socks on the card below ~ the picture was taken with a black background.

Click here for instructions on how to make ~ http://www.ourmedia.org/node/253481

For my black background pictures, I use halogen shop light. Don't shine them directly on the items being photographed.

Tripod ~ from Walmart about 30$ (they sell a cheaper one, but it isn't very good)

My camera set on "Macro Mode with High Saturation"
Camera "White Balance" is set to indoors ~ little light bulb for the symbol.
A piece of black fabric is used for my background.

Hopefully I will be able to take more pictures with white as the background.
You can add a piece of glass underneath to create a reflection on the bottom. Have also heard of people using a white board under the object.
To create a floating look add frosted plexiglass under the item with a light below.
When using a photo imaging software, you can click on the background and delete it from the picture. See example in the socks on the card below ~ the picture was taken with a black background.

Subscribe to:
Posts (Atom)
